Showing posts with label Ministry. Show all posts

Sunday, August 14, 2011

My favorite Half Price Books find

One of my favorite stores is Half Price Books.  I always find wonderful treasures, from books and cd's to journals,  notecards, etc.  Some of the items are new and some are gently used, but they are always a bargain, and we get so much for our money!  They also have an educator discount that gives an additional 10% off to teachers, including homeschoolers!  If you are a fellow homeschooler and don't already have an educator card, be sure to ask for one.  The discount is store-wide, no matter what you purchase!

A couple weeks ago, I found what turned out to be my favorite purchase ever from Half Price Books!  It was brand new and still shrink wrapped.  They had a whole display of them on an end cap in the Children's Section (I may just go back and buy a bunch for gifts).  Their price was $5, instead of the $20 retail price.  

The item is the cd set pictured above.  It is titled The Family Audio Bible and is a compilation of 36 unabridged bible stories.  Being unabridged is the best part!  This is a no-fluff, straight from God's word, reading of the Bible text.  It is 3 cd's and is read from the New Revised Standard Version of God's word.  The set is available on Amazon, as well.  There is a review on Amazon that states displeasure with the "straight from God's word" reading, but again, this is what my family loves about it so much.  Both Princess and Super Tot enjoy it and ask for it to be played in the car.  It took a couple of stories to get used to the reading style, but as a mom, I love that there are no sound effects or story-type additions.  It is true to God's word, which I for one think is the most amazing adventure book ever!


If you are looking for an audio book with eternal value, this is the one for you!  

Sunday, February 20, 2011

Easter Story Eggs

I know it Easter is still a couple months away, but I love gathering my craft and ministry ideas well in advance, and I thought you might, too!  

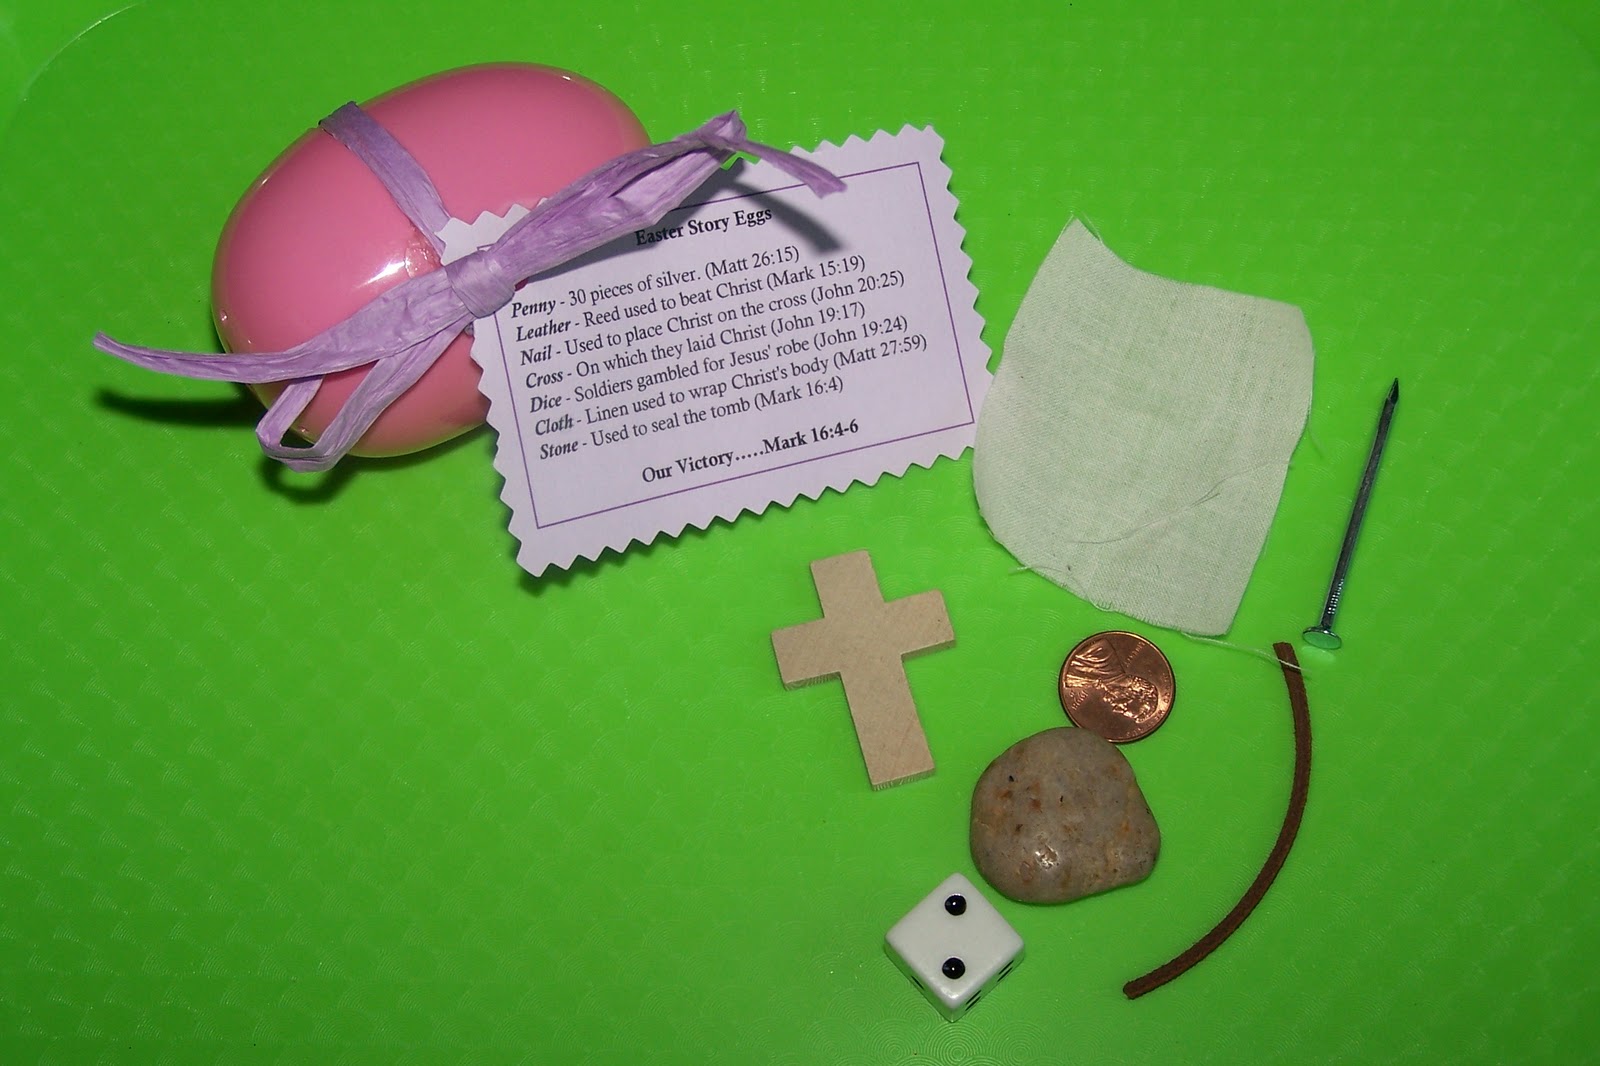
A few years ago, my husband and I were teaching children's Sunday School and wanted to put together a fun Easter project for our class.  We thought this would be a simple project that the children could put together to use as a ministry opportunity in their communities.  I was inspired by a set of Resurrection Eggs that I have used both at home, as well as in Sunday School every year.  I wanted to provide the children with a tangible way to share the Easter story with others.  They each made two eggs - one to keep and one to give away.  

Supplies Needed:
Makes 1 dozen eggs

12 large plastic Easter eggs
12 pennies
Leather lacing cut into twelve 2-inch strips (available at craft stores)
12 nails - 1 1/2 inches long
12 small wooden crosses (available at craft stores)
12 dice
Scrap of linen or other fabric, cut into twelve 1 1/2 inch squares
12 small stones
Raffia ribbon
Glue dots
Click on the document below to download and print 2 copies onto cardstock
For our Sunday School class, I had separate bowls containing each item.  First, I showed the children a completed egg and told them the Easter story using the egg.  Each item in the egg is a tangible symbol of one part of the story.  These are listed on the card, along with scripture references.  

After hearing the story, it was time for them to make their own eggs.  We created an assembly line and each child went down the line and put their own eggs together, getting one of each item and putting it in their egg.  I had already cut out the cards and hole punched them, so they were able to do everything themselves, and very easily.  We used a single glue dot to hold the ribbon onto each egg.  The children went through the line twice (this was easier than doing 2 eggs at a time), so they ended up with their 2 eggs.    

Once the eggs were put together, we practiced telling the Easter story using the egg.  We also prayed over the eggs and talked about how the children could use their extra egg as a ministry opportunity.  

Some of them decided to leave them on neighbors' doorsteps.  Some wanted to give them to friends, teachers, or the homeless.  Others had family members who they wanted to share the Gospel of Christ with.  It was really neat to see each of them coming up with mission opportunities that worked for them, and to be so excited about sharing God's Truth with others.

We got such incredible feedback from the children, as well as their parents, after doing this project.  This is an activity that we will use every year, and I hope you will, too!

Please keep in mind that there are many methods of using the egg and symbols when sharing the Easter story.  Just remember that whatever is natural for you is the best way!

ENJOY!


Wednesday, December 1, 2010

Christmas Nails


Several years ago, our family started a tradition of making and giving out Christmas Nails to various people we come into contact with throughout the Advent season.  We make a big batch of them at the start of the season, which is always a fun and special time.  As we are making the ornaments, we are praying for the people who will ultimately receive them

Once they are made, we keep some in a basket by our front door to give to delivery people or visitors, and we always have a few with us in my purse for when we are out.  We give these to waiters, grocery store clerks, postal workers, etc. - really anyone we come into contact with in the weeks leading up to Christmas.  

It is such a joy to see the faces of these people light up when they are given an unexpected gift.  They are always surprised and humble, and I have never had one turned down.

I have gotten several hugs and lots of tears.  Store clerks in particular are very touched, as many of the people they deal with this time of year are less than patient and way over-stressed.  Sadly, these clerks get the brunt of a lot of that frustration taken out on them.  

The ornaments are so easy to make.  All you need are a few basic supplies and a few minutes!  

Supplies
7 3/4" Landscaping Nails (available at your local home improvement store)
Ribbon or Cording
Cardstock, any color
Scissors or a Paper Cutter
Hole Punch
Match, Lighter or Fray Check (optional)


Begin by clicking the printable below to download and print the explanation cards onto your cardstock.  I use white or ivory cardstock and a color printer, but you could easily use red or green cardstock and black ink.


Cut out the individual cards using either scissors or a paper cutter.


Punch a hole in the upper left corner of each card.


Run ribbon through hole and tie onto nail using a square knot.


Tie a second square knot at the top, forming a loop to hang the nail with.  I use a fireplace lighter to defray the two ends of the ribbon.  Just gently hold the flame over the very edge of the ribbon for 1/2 a second.  I do this with all my ribbons and bows!  It is an optional step, but keeps them looking nice for years to come. You can also use a match or Fray Check.


Pray over each ornament and experience the incredible joy of blessing the unexpected recipient with a special gift!


May you feel the love of Christ, as you allow Him to shine on others through you this Christmas season!