Showing posts with label Crafts. Show all posts

Monday, November 26, 2012

Nativity Ornaments


Five or six years ago, my family began the tradition of making a special batch ornaments to give out to various people we come into contact with throughout the Advent season.  We give them to sales people, delivery drivers, store clerks, postal employees, waiters, etc.  

We also drive around throughout the season to look at Christmas lights.  Each night, we vote on a few favorite houses and knock on those doors to deliver our ornaments as prizes to those families.  

No matter how God chooses to have our paths cross, the recipients are always blessed and truly grateful.  In addition to thank you, we often get smiles, tears and hugs.  The biggest blessing to us, however, is bringing joy and spreading God's love to others.    

For several years, we have made Christmas Nails (tutorial here).  This year, however, we wanted to do something different.  I was looking through my craft supplies and found some wooden peg dolls and eggs.  I purchased these to make a set of dolls as a gift, but didn't end up making them. I decided to try making nativity ornaments with them.  I am so excited about how they turned out!!  I only had enough supplies today to make 4 of them, but I ordered more and can't wait to get them all made!!  

I will be posting a tutorial once those supplies come in.  I will mention that these were EASY!  It only took me about 10 minutes to make the first 4, including allowing the paint to dry.  


Sunday, November 4, 2012

Thankful Tree

UPDATED PHOTO
It just looks prettier and prettier each day!  Here it is this morning (11/8/12)

I can't lie, my family is very excited about Christmas.  We love the excitement of the season, and can't wait to begin our Advent activities.

That being said, we want to be sure not to skip over Thanksgiving.  We are so incredibly blessed, and want to dedicate the next few weeks to truly focusing on those blessings and being thankful to God for His provision.

We decided to make a "Thankful Tree" to help us concentrate on the many things we are, indeed, thankful for.  Our tree is about 4 feet tall and is a focal point in our living room.  
I used brown gift wrap/packing paper for the trunk and cut the leaves out of construction paper.  The leaves aren't pretty, but the thoughts on them are absolutely beautiful!  Every day between now and Thanksgiving, the four of us will each write something we are thankful for onto a leaf and attach it to our tree.  By Thanksgiving, there will be 88 things to thank God for on our Thankful Tree!!  

Tip:  Japanese Washi tape comes right off the wall leaving no marks and causing no damage.


Thursday, September 13, 2012

Monday, August 27, 2012

Froggie Bookmarks

Pinterest Challenge Day 4
I have seen several cute corner bookmarks on Pinterest over the past year and a half and  decided to make some today for Back to School.  I wasn't sure what I wanted to make until I went through the supplies I had on hand.  When I saw the various shades and textures of green, I decided to make alligators.  However, once I started assembling them, my vision quickly changed to little froggies.  I think they turned out very cute!

I started with a 4" square of cardstock.
I happened to have 2" post-its available, which I used as a quick way to measure.  I placed a post-it in one corner and cut around it.
 Next, I moved the post-it to the opposite corner and cut the remaining two side squares in half diagonally.
In the photo below, you can see the post-it still on the one corner, and the portions that have been cut off sitting next to the places I cut them from.
 I then removed the post-it and glued on a contrasting square, slightly smaller than 2" around.
 I glued the frog's tongue onto the center of the square.
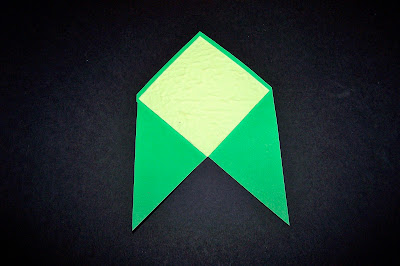
 I folded each side in and glued the top one down (if you glue the bottom one to the square, you won't be able to slide it over the corner of the book page).
 I then glued a small triangle of the contrasting paper to the top of the bookmark.
 I traced a marker lid for the eyes and cut them out.
 I placed a hole reinforcement sticker atop each eye circle.  Then, I added a small black cardstock center punched using a standard hole punch.  I glued the eyes on the bookmarks and they were finished!
I really love how these turned out, and they were so fast and easy to make.  I know we will be making more!  A set of these would be a perfect addition to a book gift or book store gift card!

Fall Tree Silhouettes

Pinterest Challenge Day 3
The kids started by painting the backgrounds onto white cardstock with yellow, orange, red and pink tempera paint.  They used various brushes and tools to get the effects they each wanted.  Once the paint was dry, they added their black trees.

This was a simple, but fun project that both kids enjoyed a lot!

Saturday, August 25, 2012

Toilet Paper Roll Race Cars

Pinterest Challenge Day 2
Ever wonder what you should do with all those left over toilet paper rolls??  You can always recycle them, but there are so many other options, too.  We have found many uses for them on our own, and Pinterest has provided me with even more ideas.  Today's Pinterest project was to make race cars for Princess and Super Tot's Playmobil people out of empty toilet paper rolls.  

It was a fun project for the kids, and we are happy with the results!!
The kids started off by painting the empty toilet paper rolls with tempera paint.  The tires were cut from an empty egg carton and painted black.  The white walls on the tires are those round hole reinforcement stickers.  Once the paint on the cars was dry, we used a craft knife to cut the openings and folded them over using glue dots to hold them in place.  The steering wheels were drawn and cut from cardstock, then glued on.  The tires are attached with prong fasteners, and the details are just stickers we had on hand.  

The cars won't last forever, but they were free to make using supplies we had on hand, and provided us with a fun morning project, along with lots of hours of play.


30 Day Pinterest Challenge


I have been on Pinterest for over a year now and absolutely LOVE it!  I have found and shared so many wonderful ideas and love having a place where I can organize the things I find online.  

I have over 2,650 pins, spread over 53 boards.  These range from school ideas to recipes, holiday decor to clothing, projects to gift ideas.  It is truly a catch all for me. 

Follow me on Pinterest here

I have enjoyed using many of the ideas I have found, but also find that I often pin something, only to forget about it for months and months.  

My solution is to start a personal 30 Day Pinterest Challenge.  My goal is to incorporate something I have pinned into each day for the next 30 days.  Whether it is preparing a recipe I have found, making a craft with my kids or incorporating a homeschool activity into our day, I plan to be intentional about using this amazing resource.  Some of the ideas may be tweaked or altered a bit, but I will be blogging about each one I use over the next 30 days.

Will you join me??  

Here are a couple of activities we've already done this week.

He's Got the Whole World in His Hands
*Dot painted coffee filters, traced & cut out child hands*  

 Self Portraits
*Traced hands and feet, drew and colored the rest*

Saturday, October 15, 2011

Stop / Go Door Sign

While we generally have an open door policy in our home, there are times when it is appropriate for a door to be closed (getting dressed, using the restroom, etc.).  We have been teaching Super Tot to knock when a door is closed for a long time, but he still struggles with not opening the door as soon as he has knocked.  We thought we would help him out a little with a simple, Tot friendly door sign.

It has worked wonderfully!  While he still cannot read the words, he knows the colors and can easily discern the faces on each side of the sign. If he approaches a door (open or closed) and sees the red side, he knows he is not to come in.  If the green side is showing, he knows he is allowed enter.

To make the sign, I printed the text and faces onto red and green construction paper, cut into 4"x6" rectangles, and glued the red and green pieces back to back.  Then I laminated the sign and used a scrapbook tool to punch the large hole in the top (you could also use scissors).

It took less than 5 minutes to make.  I just wish I had thought of it sooner!

Linking to:

Saturday, May 21, 2011

365 Things We Love About You

UPDATED SEPTEMBER 2015
I AM STILL HAPPY TO SHARE MY LIST OF 365 REASONS, SO BE SURE TO E-MAIL ME AT THE ADDRESS LISTED ON MY "CONTACT ME" PAGE IF YOU ARE INTERESTED!

This past Christmas, we wanted to make a special gift for Super Daddy, so we decided to make him a jar full of things we love about him - 365 reasons, to be exact!  It was a super easy and fun gift to make, and he enjoys it every single day.  He says it is the best gift he's ever gotten!  

With Father's Day coming up, I thought I would share the idea with you.  Obviously, this could be adapted for any parent, child, spouse or other loved one.

This is an inexpensive and precious gift, as well as environmentally friendly!  

Supplies:
Empty Jar - clean, no lid necessary
Construction paper cut down to 8 1/2" x 11"
Computer & Printer
Fabric scrap
Ponytail holder or rubber band
Label
Scissors or paper cutter

Start by making a list of 365 things you love about the person.  Think outside the box and be creative!!  I created mine on the computer and used automatic numbering so I would know when I had 365 items.  Then, I removed the number formatting so it was just the list without numbers.  Be sure to double space your list.  

Next, print the list onto the construction paper.  The construction paper fits right into the paper tray and prints well.  
 Once the list is printed, use a paper cutter or scissors to cut the items into individual slips of paper.  
 I folded each slip in half, and then in half again.  As I folded them, I placed them into the jar, so I mixed up the colors as I went.  They were REALLY smashed down tight to make them all fit.  
 Once the slips were all in the jar, I used a ponytail holder to "seal" the jar with a piece of scrap fabric.  

Lastly, I printed off a label that said, "365 Things We Love About You!" and affixed it to the front of the jar.  

Super Daddy takes one slip out to read each morning.  He actually put a second jar next to this one on his dresser, and puts the slips in the new jar once he reads them.  When I asked him why, he said he wanted to save them so he could do it again next year!!  

I know this simple gift is something that is a daily reminder to my husband of how much we love him.  It truly lifts his spirits and starts each day out with a smile!


I have been asked by several people to share my list.  I am happy to do so, but cannot post it on my blog because my husband hasn't gone through all the slips in his jar yet.  I would hate for it to be ruined for him by even accidentally seeing the list!  Please click the contact me link above and send me an e-mail if you would like a copy of my list to assist you in coming up with 365 items.  You could also do a "100 Things We Love About You" jar, should you still have trouble coming up with enough items.
Check out these other awesome blogs I am linking to:

Wednesday, March 16, 2011

Homemade Crayons

While homemade crayons are nothing new to the blogging world, we had a wonderful time making our first set!  

We purchased this cute silicone mold back in February just for this purpose!  We are doing a rainbow week in Tot School, so I thought this would be a fun time to make the crayons.  We started with old crayons, removed the papers & broke them into small pieces.  I mixed them up and grouped like colors to make a set of 7 (red, orange, yellow, green, blue, purple and pink).  Then I did two RAINBOW crayons and a few miscellaneous ones.  We put them in the oven on 350*, turned on the light and watched them melt!  It took about 10 minutes.  We took them out and swirled the bottoms with a plastic knife.  Then, we placed them in the freezer for about 10 minutes and popped them out of the molds!  They are beautiful and we couldn't be more thrilled with how they turned out!  

The slowest part was taking the papers off of the crayons.  About halfway through, I decided to use a craft knife, which worked perfectly.  They came right off and took a matter of a few seconds!

We will absolutely be making these for gifts in the future!
Linking up at:


Katie's Nesting Spot
abc button