Clothes pins are a staple in our Tot School, as they are a wonderful tool for developing and strengthening fine motor skills. Fine motor skills involve the coordination of the small hand and finger muscles, usually in combination with one's eyes. Fine motor skills are a necessity for everyday life skills such as eating, writing, manipulating buttons & zippers, etc. These fine motor skills require lots of practice, and we have found clothes pins to be one of many tools that we love and use each week to give Super Tot that practice.
I often receive comments and e-mails asking how well Super Tot is able to manipulate them. I try to answer all of your inquiries, but because I get this question so often, I thought I would address it directly on my blog.
I often receive comments and e-mails asking how well Super Tot is able to manipulate them. I try to answer all of your inquiries, but because I get this question so often, I thought I would address it directly on my blog.
I will start by saying that he certainly does not have them mastered. He is currently 32 months old and can do them on his own, but still struggles and gets very frustrated sometimes. He is getting better at manipulating them all the time. I try to give him many opportunities through a variety of Tot School activities, as you can see from my various Tot School posts.
If the basic manipulation of the clothes pins is still a struggle for your child, you might want to hold off on adding additional skills to clothes pin activities (shape matching, etc.). While I do use clothes pins for matching, counting, etc., I still like to give Super Tot ample opportunity to just "play" with the clothes pins. This is a fun and non-threatening way for your little one to begin mastering this skill.
I had this tray out this morning for Super Tot to match wooden shapes using clothes pins. He has done it before, but quickly became frustrated today attempting to manipulate the clothes pins. I never force an activity, so I thought I'd give him some practice with the clothes pins alone, giving him an opportunity to turn that frustration into a feeling of accomplishment.



If the basic manipulation of the clothes pins is still a struggle for your child, you might want to hold off on adding additional skills to clothes pin activities (shape matching, etc.). While I do use clothes pins for matching, counting, etc., I still like to give Super Tot ample opportunity to just "play" with the clothes pins. This is a fun and non-threatening way for your little one to begin mastering this skill.
I had this tray out this morning for Super Tot to match wooden shapes using clothes pins. He has done it before, but quickly became frustrated today attempting to manipulate the clothes pins. I never force an activity, so I thought I'd give him some practice with the clothes pins alone, giving him an opportunity to turn that frustration into a feeling of accomplishment.

I removed the popsicle stick shapes and replaced them with a piece of cardboard (you could use a cup, box, bowl, etc.). I asked him if he wanted to practice clipping the clothes pins on the cardboard. He was thrilled to do that, without the added pressure of matching the shapes and having to be so precise in where to clip.

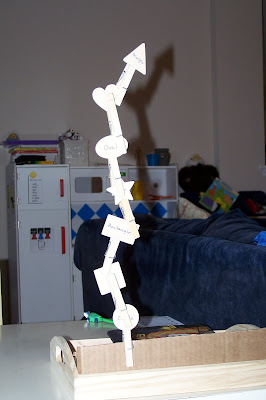
He had a wonderful time, and even surprised me when he took it up a notch and built this "tower." After building his confidence with the cardboard, he felt comfortable on his own clipping them precisely onto the much smaller space. This was the exact skill that had frustrated him so much just a few minutes before!

TIPS:
Different brands of clothes pins can be looser or tighter, thus making them easier or more difficult to manipulate.
If you open and close each one about 20 times before giving them to your child for the first time, it will assist in loosening them up a bit.
There are also clothes pins available in a slightly smaller size that are generally easier for little hands to manipulate (see photo below).