Sunday, November 28, 2010

"Crystal" Wreath Tutorial


I came across this wreath awhile back online and thought it would be perfect for Princess to make for her room.   We made it together during Super Tot's nap.  It took about 40 minutes to make and only cost $2 ($1 for the bags and $1 for the ribbon - we had the rest of the supplies on hand).  We love the finished product and it looks just beautiful on her door!

Supply List:

1 metal hanger (white is recommended)
1-2 boxes of fold top sandwich bags (not zipper bags)
Ribbon for a bow
Stuffed animal or other accent item (optional)


I failed to take a photograph of the hanger, but I simply used my hands to bend it into a circle.  It wasn't perfect, but it was easy.  You could use pliers, but we did not find that to be necessary.  You can also use wire cutters to make the wreath smaller, but we liked the size we ended up with (approx. 12" diameter).

Once you have the hanger bent into a circle, lay out your first bag and fold it in half lengthwise.


Next, pinch the bag in the center and tie it around the hanger in a single overhand knot.


GENTLY pull it tight.  Don't pull too hard or you will rip the bag.


As you tie the knots, push/slide the bags to the top of the hanger.  


Princess and I worked together on her wreath.  It was fun to do the project together, and it cut the work in half.  


Princess twisted her bags a little to make it easier for her to tie the knots.  


Once she tied each knot, she would use her hands to fluff any of the ends that were still twisted.  


We used an entire box (120) of bags.  We purchased our box at the Dollar Store and it was the last box they had.  The photo below shows how much of the hanger we still had left after using all 120 bags.  

We didn't have any more bags and really wanted to finish the project during Super Tot's nap, so we spaced the bags out a little thinner and decided it would be fine.  You could use additional bags if you wanted a fuller wreath.  

Once we put on the bow, it made a huge difference and looked great.   I decided to add the little stuffed animal to match the tree in her room.  The wreath is hanging on her door and it is just adorable!!  


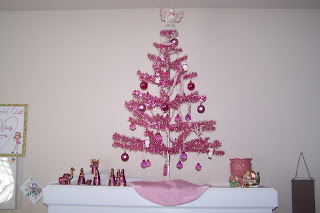
Princess has this tree in her room.  It was a gift from one of her grandmothers several years ago.  The wreath is a perfect compliment to the tree!


This was a super fun and easy craft that could be done together, or by a child alone.  I don't think you can beat $2.00 for a sweet Christmas decoration, either!!  Princess has already gotten so many comments on the wreath and people think we purchased it already made!  

Wednesday, November 17, 2010

Thankful Turkeys


Let me start by saying that I LOVE Christmas.  It is my favorite holiday and I love everything about it.  We take December off of school and spend the entire month focused on celebrating Christ and living out His example to love others.  We are intentional about doing that all year, but it is distinctly special as we celebrate Advent.

That being said, I try to be very deliberate about not skipping over Thanksgiving.  Not only do we spend November talking about what we are thankful for and the many incredible blessings the Lord has granted us, but we also do specific Thanksgiving or thankful crafts as a concrete way of remembering those blessings.  Yesterday, we made our Thankful Turkeys.  It was a fun project that both children loved, and I think the finished products are adorable.  Princess named them "Petunia" and "Picasso."  I'll bet you can figure out why!  

Let's start with Super Tot's "Picasso."  I had everything laid out for him and sat with him to complete his craft.  First, I put a dab of glue on each foot and pointed to where he should place them.  I think he did a fantastic job!  Next, he picked out his turkey's eyes from a sheet of adhesive eyes I picked up over the summer.    


Although he put them both on sideways, I was impressed at his placement.   


I put the glue on the beak and waddle for him, and he placed them on his turkey.


Next, we moved on to the feathers.  We were writing one thing on each feather that he was thankful for. I would ask him if he wanted me to write a specific item and he would say yes or no.  He ended up saying yes to:

1 - Mommy
2 - Daddy
3 - Sissy
4 - Zeppy (one of our cats)
5 - Minky (our other cat)
6 - Trains

I wrote one on each feather and gave him markers and stickers to decorate them.  He loves to use both of these, so he was thrilled.

Once he was done decorating each feather, I put some glue on a small piece of poster board and let him place the feathers on.

After each feather was in place, I pointed to the "middle" and asked him to glue the turkey's body there.  He did a pretty good job!

It's a little cubist in style, but I love it!


Princess was also excited to do her Thankful Turkey.  I had her supplies ready in one of her snack workboxes.

She put red glitter glue "toenail polish" on her turkey's feet.


Then she made a red bow for her head.


She even used a little gold to make a ring for her turkey.  

This was a very simple, yet super fun craft for both Princess and Super Tot.  Here are the finished products!


For more fun fall craft ideas, click here.  
For more Tot School ideas, click here.

Wednesday, November 10, 2010

Christmas Ornament Craft

I saw instructions to make homemade ornaments out of your old Christmas cards on another blog a few days ago and thought it was really cute.  I knew I still had all the Christmas cards we got last year, so I was excited to try it.

Supplies:
Old Christmas Cards (cut into 20 circles)
Scissors
Circle cutting tools, if available
Cardboard for templates
Pencil
Ruler
Glue
Paper Clips
Glitter
Cording or Ribbon


I started by choosing which cards would work.  I then cut 3 inch circles using my scrapbook circle cutter.  You could cut a template out of cardboard if you don't have cutting tools on hand.  I was able to get 2 circles out of some cards and only one out of some others.  I also used the emblem on the backs of some, as well as the inside of a few. 

Each ornament uses 20 circles.


I cut all the circles first.


I then cut a cardboard circle template the same size as the others.  Using a ruler, I drew and then cut out an equilateral triangle. 


I used this template to draw triangles on the backs of each circle.


Using a ruler to assure a straight fold, I folded the circles in on each of the 3 lines. 


This is what they look like when folded correctly.


The top and bottom of the ornament will each use 5 folded circles.  I laid them out before gluing to get an idea of how each piece would fit together.


I then started gluing the pieces together for the top and bottom.  As I glued each piece, I placed a paper clip to hold it in place while the glue dried.


Top and bottom glued together and drying.


Next, I laid out the middle, which consists of 10 pieces.  


Once laid out, I glued the middle section together, again using paper clips to hold the pieces while they dried.


Next, I glued the middle section to the top using paper clips once again.


I then turned the top/middle section over and glued on the bottom (don't forget to use your paper clips).  


I realized that I hadn't put in my cording as a hanger, but was able to pull the wet pieces apart and slip it in.  I used a dab of extra glue on each side and added 2 additional paper clips to hold that part tightly while it dried.  


Once dry, I removed the paper clips and applied the glitter.  This was a bit of a learning process.  I started off putting a line of glue along the edge of each section (one at a time), but the glue just ran and was too messy.  Even with the glitter on, it just looked sloppy.  After doing the first half of the ornament, I was very displeased with how it looked, and I used a wet baby wipe to remove all the glue and glitter.

I then decided to apply a thin line of glue to each side of a section right along the edge.  I did one at a time and added the glitter.  It took much longer, as I had to do both sides of each section, but the finished product is BEAUTIFUL!!  It no longer looks like a preschool art project (though I love those, too), but like something you would actually buy!  


The ornament turned out so well, that I decided to try it with some extra photographs I had leftover from scrapbooking.  I am even more excited about how the photo ornament turned out and can't wait to make more!  I'm thinking these would make fantastic gifts!

For the photo ornament, I cut each circle 2 1/2 inches in diameter and used scrapbook adhesive instead of glue to assemble the ornament.  It was MUCH faster and didn't require the paperclips (which I thought might scratch the photos).  I also made the photo ornament a little smaller, and I actually like the smaller size better.